This is a terrific recipe from King Arthur Flour - their no knead crusty white bread!
The recipe is written for beginners so at a glance it looks like lot of instructions but the gist is mix flour, yeast, salt and water, together, stick in the fridge up to a week and make bread whenever you feel like it. Well, up to four loaves. It has to rise for 45 minutes or so then bake at 450 degrees for 25 minutes or so.
I get off of work at 5:00 p.m. and can have this bread ready by 7:00 (ish) to serve with dinner during the week. In fact this is so easy and tasty I'm having to make myself take breaks in between making it just so the family doesn't get too used to having it all the time. Don't want it to no longer be special!
It has a nice crispy crust on the outside but the bread is soft and moist on the inside. Towards the end of the week it tastes a bit (just a bit) like sourdough. Yum...
Your bread will not look like the picture that accompanies the recipe. It will be flatter. The directions even say that it "doesn't rise upwards that much but seems to settle and expand" so don't freak when you don't wind up with that neat little ball. I also skip the "slash the bread with a knife" part. I've done it a couple of times but don't find it necessary.
This truly is a delicious bread for everyone but it's a great bread for anyone who has never even tried to bake their own.
Give it a try!
Thursday, January 17, 2013
Wednesday, January 02, 2013
From the Ashes of Disaster Grow the Roses of Success?
I was Pinterested in making something for my grown kids for Christmas - we did the "Dirty Santa" gift exchange this year and I wanted everyone to have a little something to take home even if they didn't want to play.
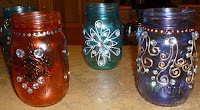
There are a ton of tutorials on Pinterest on tinting mason jars but I didn't want to tint the inside of the jars because I wanted to put friendship tea in them so I decided to tint the outside instead. Great idea, right?
I mixed Modge Podge with gel food coloring then carefully painted the outside of each jar. By carefully painted I mean I slopped that glue mixture on while sipping on some wine because I mistakenly thought that the baking process would even the color out based on one of the tutorials I'd read. What I wound up with was this:

The jars still felt fairly sticky even after baking for well over an hour so I'm not getting what the baking is supposed to do - you still can't get them wet even after baking for more than just a quick rinse off because Modge Podge is a water based glue so you're not really "curing" the jars by baking. Maybe someone can enlighten me here.
I decided to decorate them anyway. First I sprayed them with clear spray paint to act as a sealer since they felt sticky.
I used Tulip 3D paints and glue-on acrylic rhinestones which by the way need to be glued on with Beacon Gem Tack and NOT the E-6000 that was right there next to the rhinestones on the end cap of the store aisle. E-6000 is awesome glue but it eats through the mirror finish on the back of the acrylic stones and makes them cloudy. It works fine with Swarovski crystals, however.
I searched for henna tattoo patterns using Google images and then printed off the ones that I liked the best. I cut those out and taped them to the inside of the jars and used them as guides when applying my 3D paint. I did a little freehand work too once I got the feel for how the 3D paint would flow.
I just glued the stones where I thought they needed to be.
I wound up with this:


I also sent everyone home with "flameless candles," these LED lights that look like little tea light candles. My thought was that once the friendship tea is all gone they can add about a quarter of a jar of play sand or salt then set the little candles on top and they'll have neat little lanterns.
This was not exactly what I had in mind when I started but I think they turned out pretty cute. They were fun to make so there's that.
Tuesday, April 24, 2012
Smoked Mac and Cheese
Most of the cooking I do is NOT on a smoker so I don't know why I keep posting only about smoker cooking these days. Having said that here is yet another smoker recipe (you'll need to have your smoker ready, naturally):
Smoked Mac and Cheese
16 oz. package of macaroni
1/4 c. butter
1/4 c. flour
1/2 c. heavy cream 2 1
/2 c. milk
1/2 pound smoked gouda cheese, shredded
2 oz. bleu cheese crumbles
2 c. sharp cheddar cheese
Handfull of fresh grated parmesan
Salt and pepper to taste
Bring a large pot of water to a boil, then cook the macaroni according to package directions until al dente. While you're working on your macaroni melt the butter in a large skillet over medium heat, add the flour and blend, stir frequently for four minutes or so, just to remove the raw flour flavor. Add the cream and milk and continue stirring until this mixture begins to thicken - you will probably need to raise the heat. Once the sauce has thickened slightly add the cheeses and stir to melt.
Drain the macaroni and add it to the cheese mixture. Taste for seasoning and add salt and pepper as needed. Pour the mac and cheese into a disposable metal pan and smoke for approximately an hour. This is seriously good and really creamy. I thought about adding a bread crumb topping to this but I'm glad I didn't.
Sunday, April 08, 2012
Smokin' Time!!
I love this time of year - time to break out the grills and smokers!
Today I smoked two large chickens, some trout fillets and redfish on the halfshell.
Quick post - chickens were approximately 5 to 5 1/2 lbs. each. I butterflied them after a dry-brining (will write on this later), air dried them for two hours them threw them on the el-cheapo Brinkman water smoker. Smoking time for large chickens - 4 and 1/2 hours.
I also smoked trout fillets (small) and the redfish. I put the redfish on during the last hour of smoking and added the trout for the last 30 minutes, but the trout needed to be smoked longer. It was done but it hadn't had enough time to pick up the smokey flavor.
Anyway - I've had a hard time finding APPROXIMATE cook times on the internet - everyone wants to warn you of internal temperature. This is good information, but not helpful when you're trying to time your dinner. That's why I posted this and hope it helps somebody out there.
Saturday, June 25, 2011
Just a Couple of Tips -
I find myself searcing the internet for the same things over and over (because I convince myself I'll remember what I found, but I never do) so I thought I'd share just a couple of things I've learned:
A vertical bullet-type smoker works perfectly well. Competition barbecue people will likely 'pshaw' that, but I use mine all the time. Frankly I love the thing. I've made food-a-plenty on it for the outrageous price of $50. I also had a couple of people tell me that my brisket was the best brisket they've ever had. Suck on that, Cadillac smoker people!
A rack of ribs takes approximately 5 to 6 hours. You can have them technically done in 4, but they won't be tender (smoker, again). You can also cook ribs in the oven but the results are completely different than your back yard barbecue version. In the oven - 350 degrees, season ribs well, slice an onion into rings, slice a bell pepper into... rings? Scatter over the top of the seasoned ribs, bake for about an hour or until ribs fall off the bone. Again - backyard smoker (or pit) best: winter time desperation? = oven.
A thin layer of cooking oil on your stainless steel barbecue pit will help keep any rusting to a minumum. Every site I've found suggests cleaning with naval jelly, or using oil and then burning it off, but if you just use the very thin layer and buff the excess oil off you will have the shinest grill on the block with little to no trouble.
Grass always grows the best whereever you don't want it. You know that's true.
Amish friendship starter can be contained. A few very nice internet people have posted this already, but here we go again: instead of feeding your starter such large quantities of milk, sugar & flour just do this: if baking friendship bread add 1/3 c. each of sugar, flour and milk and sugar, take your cup for your bread and save the balance of what you don't use aside in a clean glass jar with a loose fitting lid in the fridge. If not baking - stir, dump half of the starter down the drain, then feed it with 1/3 c. sugar/flour/milk. You can keep this alive indefinitely - just feed at least once per month. If you don't have any starter there are plenty of recipes on the 'net. Allrecipes.com has the friendship starter, or you can search for sourdough bread. One of the first sites that comes up has a recipe for simple sourdough starter. I used this, then once it came Alive (eat your yeart out, Peter Frampton!) I added milk & sugar and so on and so sorth.
Speaking of sourdough, there are snobs a-plenty out there on the innertubes. Feel free to completely ignore these people. Perhaps they turn out the best loaf ever, but even so, big farking deal. Once a person has sucked the fun out of baking then why care what they have to say? Bake on, rockstars.
Kosher salt does taste better than table salt, Miracle Whip is not a miracle and is in fact the devil, margarine blows and since life is short anyway why not use real butter?
Truffle oil is worth the money as long as a small bottle doesn't cost more than $8 or so. Drizzle over mashed potatoes, risotto, grilled asparagus/greenbeans/zucchini, mac & cheese, Captain Crunch (just kidding about that last one). Be adventurous.
If you don't do anything else at least use fresh cracked pepper. This tastes absolutely nothing like it's already ground-in-the-can counterpart.
Last thing: laugh loud and often even if its at your own self. It really is the best medicine.
Wednesday, April 27, 2011
Cooking on a Diet
Although you'd never guess by the total lack of posts here, I love to cook. Most days, anyway. There is nothing quite so satisfying as turning out a good meal. Feeds the soul and all that.
I've lost some weight in the past few months. Shamefully it was 26 pounds and I have a few more to go. Shamefully, because I'm astounded that I allowed myself to gain that much to begin with seeing as how up to this point I've always been thin.
Be vigilant, skinnies! It can get you, too!
Anyway, what's done is done and the weight is coming off so that is what matters. I did it by knocking off the drinking during the week (which sadly is where I'd guess an alarming number of those excessive calories came from - whee!!), skipping breakfast and eating an apple for lunch.
Any cyber-stranger who stumbles upon this will probably have a bit to say about this being unhealthy, etc., and all I can say is: Meh. Calories in, calories out. I do eat healthy - I've just found that it's easier for me to control calorie intake during the day when I'm on someone else's dime.
I also ride a stationary bike for 30 minutes when I get home from work while I watch Desperate Housewives on Hulu. Again, works for me.
One of my co-workers said, "It must be hard for you trying so lose weight since you like to cook and all," and nothing could be further from the truth. Actually I think anyone who is trying to lose weight would be better off either cooking their own meals, or having a family member who likes to cook to prepare the meals. The reason is that when you're dieting and counting calories then the last thing you want to do is waste those precious calories on crummy food, right? Right. I don't feel deprived because I know at the end of the day I'm going to get a great and satisfying meal.
I do sometimes feel deprived of that after-work glass (or six) of wine, though, to tell the truth.
That's what the weekends are for!
Sunday, January 09, 2011
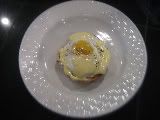
Robin's Rockin' Poached Eggs
My husband was in the mood for eggs this morning but he wanted something a bit different. He just threw this together and was AWESOME. It's a loose interpretation of Eggs Benedict. Or something like that.
Poached Eggs with Creamy Sauce
4 jumbo eggs
2 bagels split in half (we used 'everything' bagels but any plain or savory type would do)
1/2 c. heavy cream
1/8 c. grated sharp cheddar cheese
2 tbl. grated Parmigiano-Reggiano
Sea Salt & cracked black pepper to taste
Toast the bagels while you're working on the eggs and place each on a plate to serve four, or for a dinner portion place two on a plate to serve two. Or stop worrying about your waistline and cholesterol levels and eat all four. Your call.
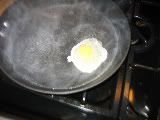
Fill a saucepan about halfway with hot water. Bring this to a rolling boil, then reduce the heat until the water is no longer being disturbed. Crack an egg into a measuring cup then carefully pour this into the hot water. Repeat with the other three eggs (my photo just shows the one because I didn't realize how totally fantastic this was going to be until after I'd eaten my share already. Oops.)

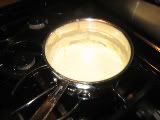
While the eggs are poaching make the sauce. Heat the heavy cream over low to medium low heat, then add the cheddar and Parmigiano and heat until the cheese is melted. Stir occasionally. No salt necessary - the cheeses are salty enough.

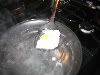
Once the egg whites have set but the yolk is still runny remove the eggs one by one:

Place an egg gently (I said GENTLY, dammit!) on top of a toasted bagel, sprinkle with a bit of sea salt and freshly cracked black pepper, then spoon one fourth of the sauce over the top of the egg.

Isn't that pretty? Believe me, it tastes 100 times better than it looks so that's saying something (if you ignore my less-than-mad picture taking skillz). This was today's breakfast but we will most definitely be having this again real soon. He's thinking about maybe adding Canadian bacon next time but I really don't think it needs it. Delicious!
Poached Eggs with Creamy Sauce
4 jumbo eggs
2 bagels split in half (we used 'everything' bagels but any plain or savory type would do)
1/2 c. heavy cream
1/8 c. grated sharp cheddar cheese
2 tbl. grated Parmigiano-Reggiano
Sea Salt & cracked black pepper to taste
Toast the bagels while you're working on the eggs and place each on a plate to serve four, or for a dinner portion place two on a plate to serve two. Or stop worrying about your waistline and cholesterol levels and eat all four. Your call.
Fill a saucepan about halfway with hot water. Bring this to a rolling boil, then reduce the heat until the water is no longer being disturbed. Crack an egg into a measuring cup then carefully pour this into the hot water. Repeat with the other three eggs (my photo just shows the one because I didn't realize how totally fantastic this was going to be until after I'd eaten my share already. Oops.)
While the eggs are poaching make the sauce. Heat the heavy cream over low to medium low heat, then add the cheddar and Parmigiano and heat until the cheese is melted. Stir occasionally. No salt necessary - the cheeses are salty enough.
Once the egg whites have set but the yolk is still runny remove the eggs one by one:
Place an egg gently (I said GENTLY, dammit!) on top of a toasted bagel, sprinkle with a bit of sea salt and freshly cracked black pepper, then spoon one fourth of the sauce over the top of the egg.
Isn't that pretty? Believe me, it tastes 100 times better than it looks so that's saying something (if you ignore my less-than-mad picture taking skillz). This was today's breakfast but we will most definitely be having this again real soon. He's thinking about maybe adding Canadian bacon next time but I really don't think it needs it. Delicious!
Subscribe to:
Posts (Atom)