This is a terrific recipe from King Arthur Flour - their no knead crusty white bread!
The recipe is written for beginners so at a glance it looks like lot of instructions but the gist is mix flour, yeast, salt and water, together, stick in the fridge up to a week and make bread whenever you feel like it. Well, up to four loaves. It has to rise for 45 minutes or so then bake at 450 degrees for 25 minutes or so.
I get off of work at 5:00 p.m. and can have this bread ready by 7:00 (ish) to serve with dinner during the week. In fact this is so easy and tasty I'm having to make myself take breaks in between making it just so the family doesn't get too used to having it all the time. Don't want it to no longer be special!
It has a nice crispy crust on the outside but the bread is soft and moist on the inside. Towards the end of the week it tastes a bit (just a bit) like sourdough. Yum...
Your bread will not look like the picture that accompanies the recipe. It will be flatter. The directions even say that it "doesn't rise upwards that much but seems to settle and expand" so don't freak when you don't wind up with that neat little ball. I also skip the "slash the bread with a knife" part. I've done it a couple of times but don't find it necessary.
This truly is a delicious bread for everyone but it's a great bread for anyone who has never even tried to bake their own.
Give it a try!
Thursday, January 17, 2013
Wednesday, January 02, 2013
From the Ashes of Disaster Grow the Roses of Success?
I was Pinterested in making something for my grown kids for Christmas - we did the "Dirty Santa" gift exchange this year and I wanted everyone to have a little something to take home even if they didn't want to play.
There are a ton of tutorials on Pinterest on tinting mason jars but I didn't want to tint the inside of the jars because I wanted to put friendship tea in them so I decided to tint the outside instead. Great idea, right?
I mixed Modge Podge with gel food coloring then carefully painted the outside of each jar. By carefully painted I mean I slopped that glue mixture on while sipping on some wine because I mistakenly thought that the baking process would even the color out based on one of the tutorials I'd read. What I wound up with was this:

The jars still felt fairly sticky even after baking for well over an hour so I'm not getting what the baking is supposed to do - you still can't get them wet even after baking for more than just a quick rinse off because Modge Podge is a water based glue so you're not really "curing" the jars by baking. Maybe someone can enlighten me here.
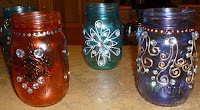
I decided to decorate them anyway. First I sprayed them with clear spray paint to act as a sealer since they felt sticky.
I used Tulip 3D paints and glue-on acrylic rhinestones which by the way need to be glued on with Beacon Gem Tack and NOT the E-6000 that was right there next to the rhinestones on the end cap of the store aisle. E-6000 is awesome glue but it eats through the mirror finish on the back of the acrylic stones and makes them cloudy. It works fine with Swarovski crystals, however.
I searched for henna tattoo patterns using Google images and then printed off the ones that I liked the best. I cut those out and taped them to the inside of the jars and used them as guides when applying my 3D paint. I did a little freehand work too once I got the feel for how the 3D paint would flow.
I just glued the stones where I thought they needed to be.
I wound up with this:


I also sent everyone home with "flameless candles," these LED lights that look like little tea light candles. My thought was that once the friendship tea is all gone they can add about a quarter of a jar of play sand or salt then set the little candles on top and they'll have neat little lanterns.
This was not exactly what I had in mind when I started but I think they turned out pretty cute. They were fun to make so there's that.
There are a ton of tutorials on Pinterest on tinting mason jars but I didn't want to tint the inside of the jars because I wanted to put friendship tea in them so I decided to tint the outside instead. Great idea, right?
I mixed Modge Podge with gel food coloring then carefully painted the outside of each jar. By carefully painted I mean I slopped that glue mixture on while sipping on some wine because I mistakenly thought that the baking process would even the color out based on one of the tutorials I'd read. What I wound up with was this:

The jars still felt fairly sticky even after baking for well over an hour so I'm not getting what the baking is supposed to do - you still can't get them wet even after baking for more than just a quick rinse off because Modge Podge is a water based glue so you're not really "curing" the jars by baking. Maybe someone can enlighten me here.
I decided to decorate them anyway. First I sprayed them with clear spray paint to act as a sealer since they felt sticky.
I used Tulip 3D paints and glue-on acrylic rhinestones which by the way need to be glued on with Beacon Gem Tack and NOT the E-6000 that was right there next to the rhinestones on the end cap of the store aisle. E-6000 is awesome glue but it eats through the mirror finish on the back of the acrylic stones and makes them cloudy. It works fine with Swarovski crystals, however.
I searched for henna tattoo patterns using Google images and then printed off the ones that I liked the best. I cut those out and taped them to the inside of the jars and used them as guides when applying my 3D paint. I did a little freehand work too once I got the feel for how the 3D paint would flow.
I just glued the stones where I thought they needed to be.
I wound up with this:


I also sent everyone home with "flameless candles," these LED lights that look like little tea light candles. My thought was that once the friendship tea is all gone they can add about a quarter of a jar of play sand or salt then set the little candles on top and they'll have neat little lanterns.
This was not exactly what I had in mind when I started but I think they turned out pretty cute. They were fun to make so there's that.
Subscribe to:
Posts (Atom)