It's a Friday night and I knew I was making ham steaks and I'd bought sweet potatoes to go along with, but instead of regular ol' baking I wanted to roast them. Today was a monstrously boring day at work so I did a little surfing for the 'perfect roasted sweet potatoes'.
I decided to use a recipe from America's Test Kitchen - roast the potatoes covered with foil first, then roast uncovered - flip potatoes over halfway through. I'm not going to share because you can either get a one day pass for free or they charge for their content.
These were not rockin' sweet potatoes. I much prefer roasting them just tossed with olive oil, salt & pepper in a 400 degree oven for about 40 - 45 mins. The outside gets a nice crust but the inside is full flavored and soft.
The America's Test Kitchen way had a nice crust on the outside but the inside was flavorless and disappointing - the outside was caramelized and delicious but the inside was rice cakes. Meh.
That's two negative posts in a row but since no one is reading this anymore because I don't post regularly then it doesn't really matter.
But if you stumbled across this blog looking for the perfect roasted sweet potatoes try this instead:
3 medium sized sweet potatoes, peeled and cubed into 3/4" dice
2 tbl olive oil
1 tsp kosher salt
1/2 tsp freshly ground black pepper
Preheat oven to 400 degrees
Toss the sweet potatoes with the olive oil, salt & pepper directly on top of a sheet pan. Put the pan into the preheated oven and roast the potatoes for 20 minutes. Use a spatula and scrape under the potatoes to remove the crusty bits from the bottom of the sheet pan and gently turn them over. Roast for another 20 to 25 minutes, or until the potatoes are fully cooked.
You should have a nice, sweet/salty crust on the outside but a creamy, flavorful sweet potato taste on the inside.
Score one: Kat
Still loving America's Test Kitchen, though. Just not this particular one.
Friday, January 07, 2011


Sunday, January 02, 2011
In Which We Decide We Hate Mario Batali (Not Really, But Sort Of)
Wow. What a major disappointment! I spent the entire day in the kitchen for this... well, crap. I could have bought an already-made Boboli crust and added the toppings Mario suggested and it would have been better.
I'm all about the homemade anymore. There aren't a lot of prepackaged foods that I buy, but this was not even worth the cost of the flour it took to make this pizza.
The reviews on Amazon.com were just sparkling but at this point I can't help but wonder - are people simply piling on the compliments just because no one wants to be the first to disparage a beloved chef or do people really enjoy eating like this? It wasn't bad - don't get me wrong - but it really seriously wasn't great. Again: Boboli.
Also I couldn't come anywhere close to broiling as long as he recommended. My first pizzas (I could fit two on a sheet) were burnt to a crisp when they came out so at that point I had to watch them like a hawk to make sure the rest didn't burn.
My husband asked me if the sauce was simply tomato paste. In other words: no flavor.
Pfft and screw.
On the other hand, when I mess up a dinner I do it with finesse. Not only will I not be making this again, but I'm donating my copy of this book to my local library.
For those of you who think this is delicious pizza, enjoy! I guess my go-to easy meal now is just an omelet with sauteed asparagus and mushrooms....
UPDATE: After dinner I asked my 17 year old son to just throw what was left of the pizzas out and he asked me if he could save them for later instead. He thought they were good. I suppose I just don't care for super thin pizza crust and in all likelihood I'm just an unwashed Cretin. Or something like that.
And I'm keeping the damned book, too.
I'm all about the homemade anymore. There aren't a lot of prepackaged foods that I buy, but this was not even worth the cost of the flour it took to make this pizza.
The reviews on Amazon.com were just sparkling but at this point I can't help but wonder - are people simply piling on the compliments just because no one wants to be the first to disparage a beloved chef or do people really enjoy eating like this? It wasn't bad - don't get me wrong - but it really seriously wasn't great. Again: Boboli.
Also I couldn't come anywhere close to broiling as long as he recommended. My first pizzas (I could fit two on a sheet) were burnt to a crisp when they came out so at that point I had to watch them like a hawk to make sure the rest didn't burn.
My husband asked me if the sauce was simply tomato paste. In other words: no flavor.
Pfft and screw.
On the other hand, when I mess up a dinner I do it with finesse. Not only will I not be making this again, but I'm donating my copy of this book to my local library.
For those of you who think this is delicious pizza, enjoy! I guess my go-to easy meal now is just an omelet with sauteed asparagus and mushrooms....
UPDATE: After dinner I asked my 17 year old son to just throw what was left of the pizzas out and he asked me if he could save them for later instead. He thought they were good. I suppose I just don't care for super thin pizza crust and in all likelihood I'm just an unwashed Cretin. Or something like that.
And I'm keeping the damned book, too.
Pizza - Mario Batali Style - Part 1 - We Make Dough
Pizza used to be a real treat when I was a kid - my mom and dad divorced when I was pretty young so I was raised by a single mother and pizza just wasn't in the budget all that often. When we got pizza, we got pizza from Pizza Hut. Or Pizza Inn. One of the big chains (does Pizza Inn even exist anymore??). As a kid I thought it was wonderful.
Now that I'm all grown I've realized how truly crummy it is. I mean, they bring hot (mostly) food right to your door which is great, but instead of viewing pizza as a real treat like I did when I was a kid I now view it as something I order because I'm hungry but just don't feel like cooking.
I want to get back to the "pizza is like Christmas" kind of feeling and since I got Mario Batali's "Molto Gusto" cookbook for actual Christmas why not try to take it up a notch?
So, the first thing is the dough. He calls for 00 flour which my grocery store naturally doesn't sell. I've substituted all purpose flour instead - hey, we gotta do what we gotta do.
The dough turned out to be extremely wet. He mentions in his book that his dough is wetter then most bread doughs and he is not kidding. I'm a baker - we have homemade bread on a regular basis at this house - this dough is WAY wetter than a typical dough. I couldn't stop myself from throwing in a few sprinkles of flour while the stand mixer was kneading it because it was so wet.
There is totally a dirty joke in there somewhere.
Mario gives the directions for dividing and partially cooking the dough and I've discovered that I suck at making round pizzas. I did have to refrigerate mine for easier handling and there is no thicker portion around the outside edge because I used a rolling pin rather than hand stretching and when I tried to scrunch the dough to make an edge it wanted to tear. I'm of German descent - not Italian, so cut me some slack. Anyway, it's not like the fillings are piled so high they threaten to slide off the edges so it should be okay. I hope.
So here is what my par-baked pizza crusts look like after cooking:

They're like oversized tortillas but fatter. This is worrysome and I've searched the internet but am not finding scads of pictures of a finished Mario Batili pizza made by the home cook.
I've chosen to make the mushroom pizza, pepperoni pizza and balsamic onion pizza so we'll see how that goes in the next post. Oh, and by the way, I am not buying his signature gridde to make these pizzas. I cooked these using a T-Fall cheapo and they browned just fine.
Still reminding me of tortillas, though...
Now that I'm all grown I've realized how truly crummy it is. I mean, they bring hot (mostly) food right to your door which is great, but instead of viewing pizza as a real treat like I did when I was a kid I now view it as something I order because I'm hungry but just don't feel like cooking.
I want to get back to the "pizza is like Christmas" kind of feeling and since I got Mario Batali's "Molto Gusto" cookbook for actual Christmas why not try to take it up a notch?
So, the first thing is the dough. He calls for 00 flour which my grocery store naturally doesn't sell. I've substituted all purpose flour instead - hey, we gotta do what we gotta do.
The dough turned out to be extremely wet. He mentions in his book that his dough is wetter then most bread doughs and he is not kidding. I'm a baker - we have homemade bread on a regular basis at this house - this dough is WAY wetter than a typical dough. I couldn't stop myself from throwing in a few sprinkles of flour while the stand mixer was kneading it because it was so wet.
There is totally a dirty joke in there somewhere.
Mario gives the directions for dividing and partially cooking the dough and I've discovered that I suck at making round pizzas. I did have to refrigerate mine for easier handling and there is no thicker portion around the outside edge because I used a rolling pin rather than hand stretching and when I tried to scrunch the dough to make an edge it wanted to tear. I'm of German descent - not Italian, so cut me some slack. Anyway, it's not like the fillings are piled so high they threaten to slide off the edges so it should be okay. I hope.
So here is what my par-baked pizza crusts look like after cooking:
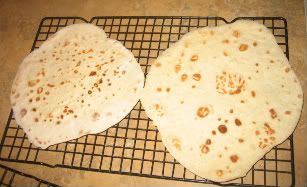
They're like oversized tortillas but fatter. This is worrysome and I've searched the internet but am not finding scads of pictures of a finished Mario Batili pizza made by the home cook.
I've chosen to make the mushroom pizza, pepperoni pizza and balsamic onion pizza so we'll see how that goes in the next post. Oh, and by the way, I am not buying his signature gridde to make these pizzas. I cooked these using a T-Fall cheapo and they browned just fine.
Still reminding me of tortillas, though...
Monday, September 06, 2010
Smoked Chicken Legs
I'm not a big fan of drumsticks, normally. They do come in handy for parties because you can't beat the price.
This time I smoked them and WOW! Now I have to say I'm not a fan of drumsticks unless they're smoked. Seriously, seriously tasty. Barbecue chicken legs? Nah. Smoked? Absolutely!
Wished I taken pictures but I didn't so just visualize deep brown deliciousness. There's a dirty joke in there somewhere.
Anyway, lets begin.
Ingredients:
Chicken drumsticks
Cajun injector liquid seasoning (I used Cajun butter flavor)
Tony Cachere all purpose seasoning
For the smoker water pan:
Two cans cherry cola
Hot water
Wash the chicken and inject each leg with seasoning until it plumps up. Place chicken in gallon sized plastic bags and refrigerate overnight. (If you decided to smoke chicken just now and are reading this, boy, are you screwed! Just kidding. You can still make this. The flavors won't have had as much time to permeate the meat, though.)
Soak a bowl full of wood chips (about five cups) in water for an hour before you start smoking your meat.
Fill your pit pan with charcoal up to the top and start your fire. While you are waiting on this bring your cola and water to a low boil. Also line your water pan with foil (easier cleanup).
Once the charcoal has grayed over you're ready to start smoking. First put a good handfull of wet chips on the charcoal. I used pecan this time. Then place the pit body on, add the water pan, fill with boiling liquid until 3/4ths of the way full, add one grate on top of the water pan. Place your chicken on and make sure the pieces aren't touching. Add the next rack to the top and put the rest of your chicken on. Smoke for three hours adding wood chips as needed to keep it smoking (at least for the first two hours of cooking). Delish!
Note: I don't have a good thermometer but I've found if I keep my smoker in the "ideal" range of the built-in thermometer I've had excellent results using my water smoker. If your fire gets too hot then open the door on the front for a bit to lower the heat.
This time I smoked them and WOW! Now I have to say I'm not a fan of drumsticks unless they're smoked. Seriously, seriously tasty. Barbecue chicken legs? Nah. Smoked? Absolutely!
Wished I taken pictures but I didn't so just visualize deep brown deliciousness. There's a dirty joke in there somewhere.
Anyway, lets begin.
Ingredients:
Chicken drumsticks
Cajun injector liquid seasoning (I used Cajun butter flavor)
Tony Cachere all purpose seasoning
For the smoker water pan:
Two cans cherry cola
Hot water
Wash the chicken and inject each leg with seasoning until it plumps up. Place chicken in gallon sized plastic bags and refrigerate overnight. (If you decided to smoke chicken just now and are reading this, boy, are you screwed! Just kidding. You can still make this. The flavors won't have had as much time to permeate the meat, though.)
Soak a bowl full of wood chips (about five cups) in water for an hour before you start smoking your meat.
Fill your pit pan with charcoal up to the top and start your fire. While you are waiting on this bring your cola and water to a low boil. Also line your water pan with foil (easier cleanup).
Once the charcoal has grayed over you're ready to start smoking. First put a good handfull of wet chips on the charcoal. I used pecan this time. Then place the pit body on, add the water pan, fill with boiling liquid until 3/4ths of the way full, add one grate on top of the water pan. Place your chicken on and make sure the pieces aren't touching. Add the next rack to the top and put the rest of your chicken on. Smoke for three hours adding wood chips as needed to keep it smoking (at least for the first two hours of cooking). Delish!
Note: I don't have a good thermometer but I've found if I keep my smoker in the "ideal" range of the built-in thermometer I've had excellent results using my water smoker. If your fire gets too hot then open the door on the front for a bit to lower the heat.
Sunday, August 08, 2010
Monday, August 31, 2009
Braised Short Ribs w/Spatzle
Made Anne Burrell's (sp?) braised short ribs for dinner Saturday night, except that I thought the recipe called for beef ribs and the grocery store didn't have bone-in beef ribs so I bought boneless.
What a bone-head...?
Recipe still ROCKED. If it was that good using the wrong main ingredient how awesome will it be using the right one?
Does this lady have a cookbook out yet? I've made a few of her recipes (I like the whole "Secrets of a Restaurant Chef" bit - makes me feel all restaurant-cheffy) and each one has turned out delicious.
Try the braised short ribs. Again, not linking to the recipe becase Food Network removes those things periodically. Luckily they show re-runs often enough that the recipes get added back in short order. Short ribs, short order...
What a bone-head...?
Recipe still ROCKED. If it was that good using the wrong main ingredient how awesome will it be using the right one?
Does this lady have a cookbook out yet? I've made a few of her recipes (I like the whole "Secrets of a Restaurant Chef" bit - makes me feel all restaurant-cheffy) and each one has turned out delicious.
Try the braised short ribs. Again, not linking to the recipe becase Food Network removes those things periodically. Luckily they show re-runs often enough that the recipes get added back in short order. Short ribs, short order...
Sunday, August 09, 2009
Julie/Julia - and Ina
I went to see Julie & Julia with my mother yesterday. It wasn't quite like the book - I know movies seldom are - but I would have liked to have seen a little more of Julie struggling with Julia's recipes. Yes, I am a sadist.
One thing highlighted in the movie was Julia Child's Boef Bourguignon so I decided I wanted to make that for our dinner tonight. I googled the recipe because I don't own "Mastering the Art of French Cooking" and it turns out that numerous people have felt the need to update this recipe. I found the original, read the instructions, and now understand why numerous people would update it. For one thing I can't even get bacon such as Julia describes. Plus there is a seperate recipe for browning the onions and blah, blah, and if there is one person I trust in the kitchen it's Ina Garten and she is a huge fan of Julia Child, but has updated a few of her recipes for modern cooks. So Julia may be a big rock star, but so is Ina.
I'm making Ina's Beef Bourguignon. I would post the link, but the Food Network removes recipes from it's site periodically and then re-adds them as the shows air. Look it up yourselves. So far everything seems okay, except that I don't have any cognac, so I'm skipping that part. I hate skipping parts in new recipes, but I thought I had cognac and I don't, and it's Sunday and here in Texas you can't buy liquor on Sunday. You can buy beer and wine, but not 'spirits'. Go figure.
I have high hopes - everything smells heavenly. Will update later....
Update: It did turn out delicious and I will probably make this again, but with some alterations. I browned the mushrooms as the recipe recommends, but when you throw them back into the stew to simmer you can't tell that they were browned at all. Next time I will either allow them to cook with the beef the whole time in order to soak up the beef juice, or I will brown them and throw them in just before serving.
I won't serve this over the bread again. I'll either make potatoes, rice or noodles and serve the bread as a side. Maybe it's because I'm a Texas girl, but I missed the starchy side.
Half as many pearl onions would be plenty. They taste just okay, so I can't see the need to have quite so many. My family picked about half of them out. They do add good flavor, so let's not omit them entirely.
All in all, very good stuff. Especially considering that I'm serving stew for dinner down here in southeast Texas where the outdoor temperature is slightly cooler than Hell.
One thing highlighted in the movie was Julia Child's Boef Bourguignon so I decided I wanted to make that for our dinner tonight. I googled the recipe because I don't own "Mastering the Art of French Cooking" and it turns out that numerous people have felt the need to update this recipe. I found the original, read the instructions, and now understand why numerous people would update it. For one thing I can't even get bacon such as Julia describes. Plus there is a seperate recipe for browning the onions and blah, blah, and if there is one person I trust in the kitchen it's Ina Garten and she is a huge fan of Julia Child, but has updated a few of her recipes for modern cooks. So Julia may be a big rock star, but so is Ina.
I'm making Ina's Beef Bourguignon. I would post the link, but the Food Network removes recipes from it's site periodically and then re-adds them as the shows air. Look it up yourselves. So far everything seems okay, except that I don't have any cognac, so I'm skipping that part. I hate skipping parts in new recipes, but I thought I had cognac and I don't, and it's Sunday and here in Texas you can't buy liquor on Sunday. You can buy beer and wine, but not 'spirits'. Go figure.
I have high hopes - everything smells heavenly. Will update later....
Update: It did turn out delicious and I will probably make this again, but with some alterations. I browned the mushrooms as the recipe recommends, but when you throw them back into the stew to simmer you can't tell that they were browned at all. Next time I will either allow them to cook with the beef the whole time in order to soak up the beef juice, or I will brown them and throw them in just before serving.
I won't serve this over the bread again. I'll either make potatoes, rice or noodles and serve the bread as a side. Maybe it's because I'm a Texas girl, but I missed the starchy side.
Half as many pearl onions would be plenty. They taste just okay, so I can't see the need to have quite so many. My family picked about half of them out. They do add good flavor, so let's not omit them entirely.
All in all, very good stuff. Especially considering that I'm serving stew for dinner down here in southeast Texas where the outdoor temperature is slightly cooler than Hell.
Saturday, August 12, 2006
Cindy's Savory Stuffed Chicken
This recipe came from a friend of mine. I made it for dinner a couple of weeks ago and my son who likes nothing raved over it. Damned kids.
It's a really easy dish and it's really pretty. Shame my picture doesn't do it justice, but it did have Wow! factor. You'll just have to take my word on that.
Cindy's Savory Stuffed Chicken
4 boneless, skinless chicken breast halves
6 oz. cream cheese, softened just to room temp.
1 tbl. chopped fresh chives
8 pieces of good bacon (don't cheap out here - it's not just for seasoning)
Salt to taste
Pepper to taste
Preheat your oven to 350 degrees.
Rinse your breasts and pat them dry. Then rinse the chicken breasts and pat THEM dry. Ha! Okay, you can skip that first part.
Place a chicken breast between two pieces of plastic wrap and pound with a rolling pin or skillet (don't use a meat tenderizer - we're not pulverizing) until the chicken is about 1/2" thick or so:

Repeat until you've finished all four pieces.
Cream the cream cheese and chives together in a small bowl, then spread the mixture evenly on the 'ugly side' of each breast. (Damn if there's not a dirty joke in there somewhere.) You should wind up with this:

Next fold the chicken breasts over (short side to short side), season very lightly with salt and pepper, then wrap one piece of bacon around the chicken lengthwise and wrap another piece around widthwise. I'm not sure that widthwise is a word, but y'all know what I mean. Be sure you wrap the bacon around the chicken so that the bacon ends will be on the bottom.
Place the chicken on a baking sheet and pop it into the oven.

Start testing for doneness at 45 minutes. If the bacon looks done and the chicken juices run clear, it's ready. A little of your cream cheese mixture will ooze out while it's cooking, but don't worry. There's still plenty in the middle.

I realize my plating leaves something to be desired, but hey - you can't have everything.
Tim's Mom's Banana Bread
I don't know Tim or his mom, but he emailed this recipe to me a couple of weeks ago. You are what you eat so let's be bananas. (I suppose I should be glad he didn't send me a recipe for Rocky Mountain Oysters.)
This is probably the best banana bread recipe I've tried. It's moist, it's delicious, it's full of banana goodness. If you have to take a thing that's healthy as it is and add fat and sugar to it, this is really the way to go.

Tim's Mom's Banana Nut Bread
3 c. all-purpose flour
1 1/2 tsp. salt
4 large bananas (the riper the bananas, the better the flavor)
4 eggs
3/4 c. nuts (I used walnuts)
1 1/2 tsp. baking soda
3/4 c. Butter flavored Crisco (don't use real butter)
1 1/2 c. sugar
1 1/2 tsp. vanilla
Preheat your oven to 350 degrees. Grease and flour two loaf pans (I used larger loaf pans because that's what I have).
Cream Crisco and sugar together with an electric mixer. Beat in eggs, one at a time.
Mash bananas, then add baking soda to bananas and stir to combine. Add this mixture to the Crisco mixture and mix to combine. Add vanilla and mix to combine.
Sift flour with salt, then mix nuts into the flour. Add this to the banana mixture, again mixing to combine all. Pour an equal amount of batter into each prepared pan and then bake for 60 to 70 minutes. To test for doneness insert a knife close to the center of the bread. It should come out clean.
Lay pans on their sides on a cooling rack and don't remove the pans until they are cool, then tap the pan bottoms lightly to loosen loaves from pans.
Tim's Notes in His Very Own Words: "I have added a little black walnut flavoring to this and it gives it a wonderful flavor. Nuts into flour before going into batter keeps nuts in suspension while baking. And soda into bananas. I can't explain it but it makes a difference."
My Notes: My bananas could have ripened another day or two but I couldn't wait any longer. Even so, this came out wonderfully full of flavor. I considered giving the second loaf to some friends but... well, moving on.
I try not to use specific name brands too often but I'd say to stick with the Crisco on this one. Sometimes store brand shortenings can be a little rancid-tasting. Since the total buttery flavor comes from the butter flavored Crisco I'd personally rather not risk my entire batch just to save a dime.
My bread took 60 minutes to bake.
Thanks, Tim. This one's a keeper.
Cheater's Spaghetti Sauce
Yes, I do buy already made spaghetti sauce in a jar. I’m not Italian, so it’s okay. Actually we treat spaghetti as a quick dinner around here and I know a lot of other families do too. In that spirit here’s a quick way to make the spaghetti sauce from a jar taste a little fancier:
The Cheater’s Spaghetti Sauce
1 large jar of your favorite spaghetti sauce (26 oz. or so)
1/2 lb. sweet Italian sausage
1/8 c. water
1/4 c. sherry
1/4 tsp. sugar (only if needed)
If your sausage came in casings, remove the casings. Crumble the sausage into a skillet, add the water and brown over medium-high heat until the sausage is done and browned. The water will have cooked away by this point so don’t add any more.
Add the sherry and deglaze the pan scraping up all of the brown bits. After the pan is deglazed and the sherry is reduced by at least half add the sauce and then stir to combine. Lower the heat to low and allow the sauce to simmer for 15 minutes, then taste it. Some sauces have more ‘tomato bite’ than others and the sugar helps to tone that down, so add the sugar at this point only if it’s needed. Allow the sauce to simmer on low while you prepare your pasta. If your sausage was particularly greasy you may need to skim a little off the top of the sauce.
Easy-peasy. I’ve tried a million different ways to jazz up jarred sauce but this one works every time and I don’t even have to add other seasonings. The sausage and sherry bring out the flavors better, I guess. Just make sure you start with a decent sauce because you’re not going to make a bad sauce much better with this method.
If you want to make it even better, make the sauce the day before and then reheat it the next day.
Comm
The Cheater’s Spaghetti Sauce
1 large jar of your favorite spaghetti sauce (26 oz. or so)
1/2 lb. sweet Italian sausage
1/8 c. water
1/4 c. sherry
1/4 tsp. sugar (only if needed)
If your sausage came in casings, remove the casings. Crumble the sausage into a skillet, add the water and brown over medium-high heat until the sausage is done and browned. The water will have cooked away by this point so don’t add any more.
Add the sherry and deglaze the pan scraping up all of the brown bits. After the pan is deglazed and the sherry is reduced by at least half add the sauce and then stir to combine. Lower the heat to low and allow the sauce to simmer for 15 minutes, then taste it. Some sauces have more ‘tomato bite’ than others and the sugar helps to tone that down, so add the sugar at this point only if it’s needed. Allow the sauce to simmer on low while you prepare your pasta. If your sausage was particularly greasy you may need to skim a little off the top of the sauce.
Easy-peasy. I’ve tried a million different ways to jazz up jarred sauce but this one works every time and I don’t even have to add other seasonings. The sausage and sherry bring out the flavors better, I guess. Just make sure you start with a decent sauce because you’re not going to make a bad sauce much better with this method.
If you want to make it even better, make the sauce the day before and then reheat it the next day.
Comm
Smothered Chicken
his is a recipe I got out of one of Justin Wilson’s cookbooks. There’s not much to it, but it really turns out delicious and it’s so simple I couldn’t resist sharing. I’ve modified the text a bit and added an instruction or two.
You do cook this chicken until it’s falling off the bones, so be careful when you’re eating it and warn your guests. I haven’t found it to be a real issue, just don’t stuff your mouth.
Smothered Chicken
1 cut up chicken, 2 to 3 pounds at the most
Louisiana Hot Sauce to taste (I used a good tablespoon plus)
2 tbl. soy sauce
Salt, to taste
2 tbl. cooking oil
2 c. chopped onion
1/2 c. chopped bell pepper
1 c. dry white wine
2 tsp. chopped garlic
1/2 c. chopped fresh parsley
Hot cooked rice (enough to serve about four people)
Rinse the chicken and pat it dry. Place the chicken in a shallow dish and season with the soy sauce, hot sauce and salt. Watch your salt usage because soy sauce is already salty. Set the chicken aside.
Heat the oil in a high sided heavy pot or skillet (I used a Dutch oven) over medium-high heat. Add the onions, bell pepper and parsley and saute’ until the onions are clear. Add the wine and stir, add the garlic and stir, then add the chicken and stir again. Lower the heat to medium-low and simmer, covered, stirring regularly, until the chicken is falling off the bones. Serve over hot cooked rice.
See? Nothing to it, but it really turns out delicious.
You do cook this chicken until it’s falling off the bones, so be careful when you’re eating it and warn your guests. I haven’t found it to be a real issue, just don’t stuff your mouth.
Smothered Chicken
1 cut up chicken, 2 to 3 pounds at the most
Louisiana Hot Sauce to taste (I used a good tablespoon plus)
2 tbl. soy sauce
Salt, to taste
2 tbl. cooking oil
2 c. chopped onion
1/2 c. chopped bell pepper
1 c. dry white wine
2 tsp. chopped garlic
1/2 c. chopped fresh parsley
Hot cooked rice (enough to serve about four people)
Rinse the chicken and pat it dry. Place the chicken in a shallow dish and season with the soy sauce, hot sauce and salt. Watch your salt usage because soy sauce is already salty. Set the chicken aside.
Heat the oil in a high sided heavy pot or skillet (I used a Dutch oven) over medium-high heat. Add the onions, bell pepper and parsley and saute’ until the onions are clear. Add the wine and stir, add the garlic and stir, then add the chicken and stir again. Lower the heat to medium-low and simmer, covered, stirring regularly, until the chicken is falling off the bones. Serve over hot cooked rice.
See? Nothing to it, but it really turns out delicious.
Chicken & Dumplings
Chicken & dumplings - real stick to your ribs southern comfort food. If I were to say that our family is known for making a particular dish, this is probably the one it would be.
This is one of those dishes that people tend to try to over-complicate by adding unnecessary ingredients. I've also heard of folks using tortillas or canned biscuits in place of making their own dumplings and if you're going to do that you might as well buy canned chicken & dumplings because that's pretty close to what you'll wind up with anyway.
Our recipe has a short, inexpensive ingredient list so not only is this good ol' comfort food but you can feed a crowd on the cheap.
These are heavy dumplings so we don't use baking powder.
The best way to teach someone to make chicken & dumplings is to have them watch and help so they can get the feel for the dumplings, but experienced cooks should have no problem with this recipe. Inexperienced cooks should also give it a shot because it's inexpensive enough and unless you burn your dumplings, it'll still be edible. That wasn't the most encouraging way of putting that, was it? Sometimes you just have to take a leap of faith. Or something like that.
Roll up your sleeves, kids. This one's messy, but worth it.
Kat's Chicken & Dumplings
1 - 4 lb. whole chicken
2 1/2 tsp. salt (plus extra if needed, to finish)
1 tsp. black pepper (plus extra to finish)
5 to 5 - 1/2 cups all-purpose flour (more, if needed)
1 large onion, chopped
2 to 3 chicken bouillion cubes, Better Than Bouillion paste, or homemade chicken stock
Remove the neck and gizzards from the chicken and wash the chicken thoroughly. Place the chicken along with the neck (if it was included - they aren't always) in a dutch oven and cover the chicken completely with water and add the salt and pepper. Don't add the gizzards. Either save them for something else or throw them out.
My 5 quart dutch oven is squatter and wider, so it's not possible for me to completely cover the chicken:

I just fill it as much as possible and turn the chicken over once in a while as it's cooking to get the whole thing done.
Bring your chicken to a boil and boil it over medium-high heat until it's beginning to fall off the bones; about an hour. Remove from heat, remove the chicken and neck from the broth, and leave all of the broth in the pot. Discard the neck. Cool chicken completely and debone. I like to leave mine in the largest chunks possible because it will fall apart a bit during the second cooking:

Place 4 and 1/2 cups of the flour in a large mixing bowl. Add 2 cups of the cooled chicken broth and stir to wet all flour. Your dough should form a ball but be extremely tacky (much like myself). If it's too dry, add broth. If it's too wet, add a little flour.
Pour the remaining flour on a large, flat, clean surface where you can roll out and cut your dumplings. I worked straight on top of my counter and shame on me because that's a good way to cut up your counter tops. You should use a couple of sheets of wax paper.
Make sure your surface is very generously floured. Scrape the dumpling dough out onto the surface and knead in as much flour as it takes to give you a smooth firm dough, kneading no more than 25 times or so. Add more flour to your work surface if needed to keep the dumplings from sticking to it, and roll the dough out to 1/4" thickness. Use a sharp knife and cut the dumplings into approx. 2" x 2" squares.

Add enough water (or homemade stock) to your pot to bring the liquid level to just shy of 3/4ths of the way full and bring it to a rolling boil.

Once the broth is boiling add the dumplings one at the time, stirring gently after each few dumplings to keep them from sticking. This is easiest if you add them to the center of the pot.
After all of the dumplings have been added, add the onions, bringing the broth back up to a boil. Then add the chicken, bring back to a boil again, then lower heat to medium-low.
The richness of your broth depends on your chicken. Some just taste better than others. Taste the broth. If it's not 'chickeny' enough add bouillion cubes one at a time, tasting after each addition. Add a generous sprinkle of black pepper. Additional salt usually isn't needed if you've used bouillion or Better Than Bouillion. I used a generous spoonfull of Better Than Bouillion in mine.
If you had homemade stock you probably won't need the bouillion boost but you may need a little salt.
At first your chicken broth will look clear, but as it cooks it will thicken and turn opaque.

Simmer, uncovered, over medium-low heat until the onions are completely tender, 30 to 40 minutes. Stir gently all the way to the bottom of the pot occasionally to make sure dumplings aren't sticking.
We serve ours in bowls with cornbread alongside.
Basic Cornbread
Most cornmeal packages come with a cornbread recipe already printed on them, but they’re all just a little bit different. I’ve had a few come out on the bitter side, so this is the one I use because it comes out perfect every time.
Cornbread
1 - 1/4 cups all-purpose flour
3/4 c. yellow corn meal
1/4 c. sugar
1/2 tsp. salt
1 c. milk
1/4 c. cooking oil
1 egg, beaten
Preheat your oven to 400 degrees. Grease an 8 or 9 inch pan, or 12 muffin cups. Combine the dry ingredients, then add the remainder of ingredients and stir just until dry ingredients are moistened. Pour batter into prepared pan or muffin cups.
If baking in a pan, bake for 20 to 25 minutes until light golden and a toothpick inserted in the center comes out clean.
If baking in muffin tins bake for 15 to 20 minutes, until light golden.
Cornbread
1 - 1/4 cups all-purpose flour
3/4 c. yellow corn meal
1/4 c. sugar
1/2 tsp. salt
1 c. milk
1/4 c. cooking oil
1 egg, beaten
Preheat your oven to 400 degrees. Grease an 8 or 9 inch pan, or 12 muffin cups. Combine the dry ingredients, then add the remainder of ingredients and stir just until dry ingredients are moistened. Pour batter into prepared pan or muffin cups.
If baking in a pan, bake for 20 to 25 minutes until light golden and a toothpick inserted in the center comes out clean.
If baking in muffin tins bake for 15 to 20 minutes, until light golden.
Under the Sea Cake
My son asked for a blue cake for his birthday. He also wanted it to be chocolate. Blue chocolate seemed kind of tough to me, so I searched around the 'net and found pictures of "under the sea" type cakes. Here's my version:

Is that cute or what??
There's no real recipe here. I used a boxed cake mix (chocolate fudge) and made two layers. I scooped about 3/4ths of an inch depth of cake out of the top layer and poured blue raspberry Jello on top once the Jello was close to being set.
Instead of using frosting between the cake layers I used seedless raspberry jam. That really made for a tasty cake, especially the next day after some of it got soaked into the cake itself.
The little fish are goldfish snack crackers with their smiles painted on with green icing. The grass is made from green fruit roll-ups. The frosting was white chocolate tinted with blue food coloring and the 'sand' is graham cracker crumbs mixed with a little sugar for sweetness. The Spongebob is a candle.
Since this cake has Jello on top it has to be refrigerated but that doesn't affect the texture or flavor one bit.
Port Tenderloin with Port Wine Blackberry Sauce
This is one of the simplest, fastest cooking entrees ever, but it sure is good.
Pork Tenderloin with Port Wine Blackberry Sauce
1-1 and 1/2 to 2 lb. pork tenderloin
Kosher salt, to taste
Fresh cracked black pepper, to taste
2 tbl. olive oil
1/2 c. port wine
2 tbl. butter
1/2 c. blackberry jam
Slice pork tenderloin into medallions about 3/4″ thick. Most tenderloin recipes I see call for the tenderloin to be beaten with a meat mallet but I’ve never found that necessary. Tenderloin cooks fast and is tender, so it doesn’t really matter if the medallions are a bit uneven, size-wise.
Sprinkle both sides of each medallion with salt and pepper.
Turn your oven on to 200 degrees.
Heat 1 tbl. olive oil in a large sautee pan over medium-high heat. This amount of tenderloin will need to cook in two batches, so you’ll need to add the rest of the oil to the pan for the second batch. Cook the medallions approximately 3 to 4 minutes per side, until done. Place the cooked medallions on a platter and place in your oven to keep warm.
Deglaze the pan with the port wine scraping up all the browned bits. Allow the liquid to reduce by half, then add the butter one tablespoon at a time. The sauce will thicken slightly at this point. Now add the jam, stirring constantly until thoroughly heated. Remove the sauce from the heat.
Serve the medallions by plating and passing the sauce over the top.
How easy was that?
A variation on this dish which has a slightly lighter flavor is to replace the port wine with sherry and replace the blackberry jam with cherry preserves.
Pork Tenderloin with Port Wine Blackberry Sauce
1-1 and 1/2 to 2 lb. pork tenderloin
Kosher salt, to taste
Fresh cracked black pepper, to taste
2 tbl. olive oil
1/2 c. port wine
2 tbl. butter
1/2 c. blackberry jam
Slice pork tenderloin into medallions about 3/4″ thick. Most tenderloin recipes I see call for the tenderloin to be beaten with a meat mallet but I’ve never found that necessary. Tenderloin cooks fast and is tender, so it doesn’t really matter if the medallions are a bit uneven, size-wise.
Sprinkle both sides of each medallion with salt and pepper.
Turn your oven on to 200 degrees.
Heat 1 tbl. olive oil in a large sautee pan over medium-high heat. This amount of tenderloin will need to cook in two batches, so you’ll need to add the rest of the oil to the pan for the second batch. Cook the medallions approximately 3 to 4 minutes per side, until done. Place the cooked medallions on a platter and place in your oven to keep warm.
Deglaze the pan with the port wine scraping up all the browned bits. Allow the liquid to reduce by half, then add the butter one tablespoon at a time. The sauce will thicken slightly at this point. Now add the jam, stirring constantly until thoroughly heated. Remove the sauce from the heat.
Serve the medallions by plating and passing the sauce over the top.
How easy was that?
A variation on this dish which has a slightly lighter flavor is to replace the port wine with sherry and replace the blackberry jam with cherry preserves.
Banana Split Cake
I got this recipe out of a magazine years ago and unfortunately my memory is shot so I don’t remember which magazine. The important part is that I remember the recipe, though, so yay, me.
The original recipe included banana cake from scratch but as I found out later when I was pressed for time boxed mix works every bit as well and oh, the horror! Truthfully any banana cake recipe will do, box mix or scratch, as long as there is enough batter to make two 8″ or 9″ layers.
Besides being delicious it’s impressive looking. I made it recently for a party at my sister-in-law’s house and I would be posting pictures but I was on the tipsy side so I sort of slopped it together. Lesson: Don’t buildeth thine Banana Split Cake when thou art in thy cups.
One more thing - I’m not generally a Cool Whip fan but it’s good in this cake. Use fresh whipped cream if you’d rather.
Anyway, let’s get on with it.
Banana Split Cake
Banana cake mix baked according to package directions for a 8″ or 9″ layer cake (or banana cake from scratch)
1 8 oz. tub of Cool Whip, thawed and divided into two bowls
1 pint of fresh strawberries, stems removed, chopped to 1/2″ pieces
1 8 oz. can of pineapple tidbits or crushed pineapple, well drained
1 11 oz. jar of hot fudge topping (not the thin, runny chocolate sauce), heated slightly so that it can be poured
1/4 c. chopped salted peanuts
Mix half of the Cool Whip with the chopped strawberries and set aside. Mix the other half of the Cool Whip with the pineapple. Set that aside also.
Take your cooled cake layers and split each in half horizontally so that you now have four layers instead of two. Place the first layer on your cake plate, bottom side down. Spoon the Cool Whip/pineapple mixture on this layer and spread to the edge of the cake but not down the sides.
Place the next layer on top, top side down. This makes it easier to make your cake layers sit straight because the whipped topping/fruit mixture acts like a fluffy cushion. Pour enough hot fudge over the second layer so that it covers the layer and runs down the cake sides - a bit less than half the jar. Sprinkle with half of the chopped peanuts.
Place next layer on top, bottom side down. Top with Cool Whip/strawberry mixture. Place last layer on top, top side up. Pour hot fudge over this layer until it coats the top layer and runs down the sides of the cake. Sprinkle with the remaining peanuts and serve immediately.
This is really good but unfortunately doesn’t keep really well. It can be refrigerated for a couple of days, but I normally only make this for parties so that most of it is eaten as soon as it’s decorated.
The original recipe included banana cake from scratch but as I found out later when I was pressed for time boxed mix works every bit as well and oh, the horror! Truthfully any banana cake recipe will do, box mix or scratch, as long as there is enough batter to make two 8″ or 9″ layers.
Besides being delicious it’s impressive looking. I made it recently for a party at my sister-in-law’s house and I would be posting pictures but I was on the tipsy side so I sort of slopped it together. Lesson: Don’t buildeth thine Banana Split Cake when thou art in thy cups.
One more thing - I’m not generally a Cool Whip fan but it’s good in this cake. Use fresh whipped cream if you’d rather.
Anyway, let’s get on with it.
Banana Split Cake
Banana cake mix baked according to package directions for a 8″ or 9″ layer cake (or banana cake from scratch)
1 8 oz. tub of Cool Whip, thawed and divided into two bowls
1 pint of fresh strawberries, stems removed, chopped to 1/2″ pieces
1 8 oz. can of pineapple tidbits or crushed pineapple, well drained
1 11 oz. jar of hot fudge topping (not the thin, runny chocolate sauce), heated slightly so that it can be poured
1/4 c. chopped salted peanuts
Mix half of the Cool Whip with the chopped strawberries and set aside. Mix the other half of the Cool Whip with the pineapple. Set that aside also.
Take your cooled cake layers and split each in half horizontally so that you now have four layers instead of two. Place the first layer on your cake plate, bottom side down. Spoon the Cool Whip/pineapple mixture on this layer and spread to the edge of the cake but not down the sides.
Place the next layer on top, top side down. This makes it easier to make your cake layers sit straight because the whipped topping/fruit mixture acts like a fluffy cushion. Pour enough hot fudge over the second layer so that it covers the layer and runs down the cake sides - a bit less than half the jar. Sprinkle with half of the chopped peanuts.
Place next layer on top, bottom side down. Top with Cool Whip/strawberry mixture. Place last layer on top, top side up. Pour hot fudge over this layer until it coats the top layer and runs down the sides of the cake. Sprinkle with the remaining peanuts and serve immediately.
This is really good but unfortunately doesn’t keep really well. It can be refrigerated for a couple of days, but I normally only make this for parties so that most of it is eaten as soon as it’s decorated.
Peanut Butter Fudge Cookies
These cookies are based off of one of Paula Deen’s recipes. I think she calls them Magic Peanut Butter Cookies or something like that. Anyway, I was at home while a sheetrock repair was being done and I got bored while waiting, so I thought I’d try making them. Nothing is quite as boring as waiting someone to finish something you have no control over - take my word for that.
Turns out I was a little short on peanut butter (I probably had 3/4’s of a cup) so I added in some peanut butter chips I had left over from another batch of cookies. I was afraid they wouldn’t turn out but they did, and they came out tasting quite a bit like peanut butter fudge, thanks to the chips. I fudged on the name a little. Hopefully Paula won’t care.
These are the simplest cookies I’ve ever made. They would be perfect to make with children because you don’t even need to get your hand mixer dirty. I’ll definitely make them again, except with the correct amount of peanut butter. Add yourself a drizzle of melted chocolate and then you’ll have a batch of peanut butter chocolate fudge cookies.
Peanut Butter Fudge Cookies
1 cup creamy peanut butter
1 cup sugar
1 tsp. vanilla
1 egg
1/2 cup peanut butter baking chips
Preheat your oven to 350 degrees and line a large cookie sheet with parchment paper. If you don’t have parchment paper you’ll need to grease your cookie sheet.
Mix the peanut butter, sugar, vanilla and egg with a spoon until well blended and then stir in the peanut butter chips. Drop by rounded spoonfulls on the cookie sheet 1 and 1/2 inches apart or so and press any mounds down lightly. Bake for 12 minutes, cool for one minute then remove to a wire rack to cool completely. Store in an air-tight container.
This should make approximately 18 cookies. How easy was that?
Turns out I was a little short on peanut butter (I probably had 3/4’s of a cup) so I added in some peanut butter chips I had left over from another batch of cookies. I was afraid they wouldn’t turn out but they did, and they came out tasting quite a bit like peanut butter fudge, thanks to the chips. I fudged on the name a little. Hopefully Paula won’t care.
These are the simplest cookies I’ve ever made. They would be perfect to make with children because you don’t even need to get your hand mixer dirty. I’ll definitely make them again, except with the correct amount of peanut butter. Add yourself a drizzle of melted chocolate and then you’ll have a batch of peanut butter chocolate fudge cookies.
Peanut Butter Fudge Cookies
1 cup creamy peanut butter
1 cup sugar
1 tsp. vanilla
1 egg
1/2 cup peanut butter baking chips
Preheat your oven to 350 degrees and line a large cookie sheet with parchment paper. If you don’t have parchment paper you’ll need to grease your cookie sheet.
Mix the peanut butter, sugar, vanilla and egg with a spoon until well blended and then stir in the peanut butter chips. Drop by rounded spoonfulls on the cookie sheet 1 and 1/2 inches apart or so and press any mounds down lightly. Bake for 12 minutes, cool for one minute then remove to a wire rack to cool completely. Store in an air-tight container.
This should make approximately 18 cookies. How easy was that?
Food Snobbery & Folks Who Try to Suck the Fun out of Cooking
I’ve been wanting to post something about the snobbery that exists on food-related sites for quite some time now, but I’m never sure exactly how to go about it. I haven’t bothered trying to build up the readership here because of that.
I’m a southern woman - a southeast Texan to be precise, so the diet I grew up with reflects that. Tex-Mex (which we never bother to call Tex-Mex; it’s just Mexican food), Cajun, and simple southern foods are what I grew up on and they’re what I prefer to this day. Feed me a big bowl of black-eyed peas with the pot liquor poured over a hunk of cornbread and I’m in Heaven.
That doesn’t mean that I don’t appreciate other foods. I really like Chinese, Japanese, Italian, French (and the list could go on and on). My own cooking experiences and daily diet center mostly around simple foods, though, and I don’t feel this is something to be ashamed of. How many cookbooks are dedicated to southern style cooking? A LOT. Why? Because it’s GOOD, that’s why, yet some of the people who call themselves ‘foodies’ make a point of putting down the food that I know and love.
I’m not implying that everybody has to like everything; I just don’t see the value in insulting the cuisine (yeah - I said cuisine) of a large population of the United States. If you don’t like it then by all means, don’t eat it, but don’t imply that something is wrong with me because I do. Disdain is not helpful. Or necessary. We should be learning things from each other; not trying to tear each other down.
This probably makes no sense to you regular Kat’s Stuff readers because none of this comes from you, it’s just an observation of mine. I started this site because I wanted to share some recipes. I thought it would be fun and maybe even helpful. I’ve been trying to write them with plain and simple directions so that everybody can play, and I believe I’m approachable enough so that if a person doesn’t understand a thing then they won’t be afraid to ask.
Searching for food blogs to link on this site has left a bad taste in my mouth (ha!). If any of you read any decent, food snob-free food blogs then please slap the links on me so I can check them out.
In the meantime fix yourself some chips and salsa and have a nice, cold, margarita. That’s good stuff and I don’t care who says what.
I’m a southern woman - a southeast Texan to be precise, so the diet I grew up with reflects that. Tex-Mex (which we never bother to call Tex-Mex; it’s just Mexican food), Cajun, and simple southern foods are what I grew up on and they’re what I prefer to this day. Feed me a big bowl of black-eyed peas with the pot liquor poured over a hunk of cornbread and I’m in Heaven.
That doesn’t mean that I don’t appreciate other foods. I really like Chinese, Japanese, Italian, French (and the list could go on and on). My own cooking experiences and daily diet center mostly around simple foods, though, and I don’t feel this is something to be ashamed of. How many cookbooks are dedicated to southern style cooking? A LOT. Why? Because it’s GOOD, that’s why, yet some of the people who call themselves ‘foodies’ make a point of putting down the food that I know and love.
I’m not implying that everybody has to like everything; I just don’t see the value in insulting the cuisine (yeah - I said cuisine) of a large population of the United States. If you don’t like it then by all means, don’t eat it, but don’t imply that something is wrong with me because I do. Disdain is not helpful. Or necessary. We should be learning things from each other; not trying to tear each other down.
This probably makes no sense to you regular Kat’s Stuff readers because none of this comes from you, it’s just an observation of mine. I started this site because I wanted to share some recipes. I thought it would be fun and maybe even helpful. I’ve been trying to write them with plain and simple directions so that everybody can play, and I believe I’m approachable enough so that if a person doesn’t understand a thing then they won’t be afraid to ask.
Searching for food blogs to link on this site has left a bad taste in my mouth (ha!). If any of you read any decent, food snob-free food blogs then please slap the links on me so I can check them out.
In the meantime fix yourself some chips and salsa and have a nice, cold, margarita. That’s good stuff and I don’t care who says what.
Good Ol' Ham
Ham is one of my favorite meats but I only eat it a few times a year. Maybe it’s because it seems ‘too special’ to me to just eat any old time. I need to work on changing that because not only is it good as a main course but what’s left over can be used in thousands of other dishes.
This ham recipe is another one courtesy of Surfie at Synaptic Interlude and boy does it sound good! She says you can add a cup of dark brewed coffee to the pan juices to add to the gravy if you desire and let me tell you: you should desire.
If you remove the ham to a warm platter first, turn the heat on under the pan the ham baked in, then add the coffee while stirring up the brown bits you’ve got yourself some red eye gravy. Good stuff, that.
Thanks again, Surfie.
Large Ham Recipe
1 (8-10 pound) fully cooked bone-in ham
As many cloves as you need.
1 (16 ounce) package of brown sugar
1 cup spicy brown mustard
1 cup apple cider
1/2-3/4 cups bourbon (the rest is for you..:)
Trim fat were needed. Make shallow cuts in a diamond pattern. Place cloves in the center of each diamond and where every one sees “fit” to make it “pretty.” I usually do this the night before and let it sit in the fridge overnight, covered, in one of the “throw away” foil baking pans with a cookie sheet underneath.
Mix the next four ingredients and pour over the ham in the morning/afternoon.
Bake on the lowest oven rack at 350 for about two hours or until thermometer reaches 145 degrees. Baste with the pan juices every 20 minutes or so with a brush or baster.
Remove from oven and let cool.
One can also add a cup of dark brewed coffee to the pan juices to add to the “gravy,” if one so desires.
This ham recipe is another one courtesy of Surfie at Synaptic Interlude and boy does it sound good! She says you can add a cup of dark brewed coffee to the pan juices to add to the gravy if you desire and let me tell you: you should desire.
If you remove the ham to a warm platter first, turn the heat on under the pan the ham baked in, then add the coffee while stirring up the brown bits you’ve got yourself some red eye gravy. Good stuff, that.
Thanks again, Surfie.
Large Ham Recipe
1 (8-10 pound) fully cooked bone-in ham
As many cloves as you need.
1 (16 ounce) package of brown sugar
1 cup spicy brown mustard
1 cup apple cider
1/2-3/4 cups bourbon (the rest is for you..:)
Trim fat were needed. Make shallow cuts in a diamond pattern. Place cloves in the center of each diamond and where every one sees “fit” to make it “pretty.” I usually do this the night before and let it sit in the fridge overnight, covered, in one of the “throw away” foil baking pans with a cookie sheet underneath.
Mix the next four ingredients and pour over the ham in the morning/afternoon.
Bake on the lowest oven rack at 350 for about two hours or until thermometer reaches 145 degrees. Baste with the pan juices every 20 minutes or so with a brush or baster.
Remove from oven and let cool.
One can also add a cup of dark brewed coffee to the pan juices to add to the “gravy,” if one so desires.
Cholent
This is a Jewish dish. The recipe came from a friend of mine years ago and it has never failed me — my family loves it. The barley is everyone’s favorite part.
Kishke is a sausage that in my friend’s case was made with chicken, chicken fat and so on, but since I’m not Jewish I just use Polish sausage. The flavor of the finished product is exactly the same.
Since this dish has to cook for so long I think it’s easier to assemble it the night before and refrigerate it until the next morning - that way all that’s left to do is to turn the stove on and boil some water.
Cholent
2 lbs. stew meat
1/3 c. barley
1/3 c. dry lima beans
4 medium potatoes, peeled and left whole
1 large onion, chopped
1/2 lb. kishke (or Polish sausage) cut to 3 or 4 inch lengths
Paprika
Garlic Powder
Salt
Pepper
Preheat the oven to 250 degrees.
Place the stew meat evenly across the bottom of a casserole or medium roasting pan that is about 5″ deep. Dump the barley in a little pile on top of the meat on one end of the pan and dump the limas on the other end. Place the whole peeled potatoes in the middle on top of the stew meat.
Sprinkle the onion evenly across everything, add the sausage and season GENEROUSLY with paprika, garlic powder, salt and pepper. Pour enough boiling water in the pan to just cover everything.
Bake for 12 hours. Yes, I said 12 hours.
Add boiling water as needed. It has been my experience that I only have to add water once more about halfway through the cooking time. The resulting dish comes out coated in a gravy (so to speak) but it should just nicely coat everything - not be soupy like a regular stew. Your sausage will look very brown but trust me, it’s not burned, it’s DELICIOUS.
I’m sorry I don’t have exact measurements for the spices. They weren’t provided to me either but that’s never been a problem. Just remember that you’re seasoning a pretty good amount of food. The next time I make it I’ll work out what the exact measurements should be and I’ll update this recipe with them and a couple of pictures.
Seriously, this stuff is good.
Kishke is a sausage that in my friend’s case was made with chicken, chicken fat and so on, but since I’m not Jewish I just use Polish sausage. The flavor of the finished product is exactly the same.
Since this dish has to cook for so long I think it’s easier to assemble it the night before and refrigerate it until the next morning - that way all that’s left to do is to turn the stove on and boil some water.
Cholent
2 lbs. stew meat
1/3 c. barley
1/3 c. dry lima beans
4 medium potatoes, peeled and left whole
1 large onion, chopped
1/2 lb. kishke (or Polish sausage) cut to 3 or 4 inch lengths
Paprika
Garlic Powder
Salt
Pepper
Preheat the oven to 250 degrees.
Place the stew meat evenly across the bottom of a casserole or medium roasting pan that is about 5″ deep. Dump the barley in a little pile on top of the meat on one end of the pan and dump the limas on the other end. Place the whole peeled potatoes in the middle on top of the stew meat.
Sprinkle the onion evenly across everything, add the sausage and season GENEROUSLY with paprika, garlic powder, salt and pepper. Pour enough boiling water in the pan to just cover everything.
Bake for 12 hours. Yes, I said 12 hours.
Add boiling water as needed. It has been my experience that I only have to add water once more about halfway through the cooking time. The resulting dish comes out coated in a gravy (so to speak) but it should just nicely coat everything - not be soupy like a regular stew. Your sausage will look very brown but trust me, it’s not burned, it’s DELICIOUS.
I’m sorry I don’t have exact measurements for the spices. They weren’t provided to me either but that’s never been a problem. Just remember that you’re seasoning a pretty good amount of food. The next time I make it I’ll work out what the exact measurements should be and I’ll update this recipe with them and a couple of pictures.
Seriously, this stuff is good.
Subscribe to:
Posts (Atom)